Visual script editor
EyeAutomate is a visual script editor. Use EyeAutomate to create and maintain scripts and images.
Editing a Script
Edit scripts directly in the WYSIWYG editor, which displays both text and images in context. This allows for easy maintenance and readability.
Adding Commands
-
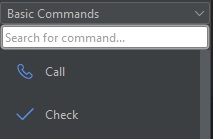
Use the Command List to insert commands into the script.
-
Use the drop-down to browse command categories or the search field to locate a specific command.
-
Right-click a command and select Context Help to view usage details, parameters, and examples.
-
Left-click a command to insert it at the current cursor position. Some commands may require parameter input before being added.
You can also type commands manually in the editor. Use the Script menu or toolbar buttons to insert parameters (such as values, images, or scripts). Press F1 for context-sensitive help on a selected command.
Capturing Images
Images can be captured or recaptured from various parts of EyeAutomate.
-
Click and drag the mouse to select a screen area for capture.
-
Release the mouse button to capture, or right-click to cancel.
-
Use the mouse scroll wheel to zoom in/out when capturing images from the Capture or Remote Window.
-
The Capture Window appears when the screen is zoomed.
-
Adjust capture behavior in Settings → Capture Options.
-
Images must be at least 10×10 pixels in size.
Capture Options
Available in Settings → Capture Options:
|
Hide Studio During Capture |
Temporarily hides EyeAutomate during capture. |
|
Use Capture Dialog |
Opens a capture dialog instead of full-screen mode. This is the default on non-Windows systems. |
Rename Image
Image names are auto-generated. To rename an image:
-
Right-click the image.
-
Select Rename.
Renaming also updates the script automatically. However, this change affects only the currently edited script—other scripts referencing the original image name will not be updated.
Image Properties
Open the Properties dialog by clicking on an image. Here you can:
-
Recapture or load a new image
-
Change or select a target location
-
Define a target area
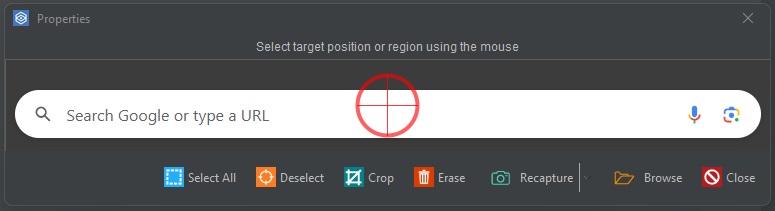
Target Location:
-
Click anywhere within or outside the image to set a new target location.
-
By default, it’s centered in the image.
Target Area:
-
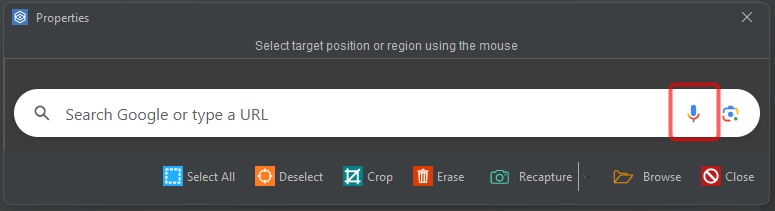
Click and drag to draw a rectangle defining the target area.
-
The target location will be centered within this area for Move or Click commands.
Other Image Tools:
-
Select All – Selects the entire image.
-
Deselect – Clears selection and re-centers the target.
-
Crop – Trims the image to only the selected rectangle.
-
Erase – Removes content in the selected area and fills it with the detected background color to reduce distraction for image recognition.
Comments
Add comments and blank lines to improve script readability.
-
Comments start with
//and appear in italic.
Detect Font from Image
For data-driven scripts, using text instead of images is often more efficient. To support this:
-
Use the Font command to set the correct font.
-
Right-click an image and select Detect Font from Image.
-
Specify the text and font style for better detection.
-
A Font command will be suggested when a match is found.
Copying Images
To manage large image sets:
-
Use Script → Copy Images to copy all images in the current script to a different location.
-
Use Set Image Folder in Settings to view the script with the new image set.
Copying Scripts
Use Script → Copy Script to duplicate the current script to a new location.
-
All associated images are also copied to an
imagesfolder under the new script path. -
A
Set ImageFolder "{ScriptFolder}/images"command is added to the script to ensure portability.
Importing & Exporting Bundles
Import Bundle
Bundles (files with .eye extension) include scripts, images, data, widgets, commands, and tools. They are ZIP archives that extract into the EyeAutomate root folder.
-
Use File → Import Bundle to extract the bundle.
-
Restart EyeStudio if required.
Export Bundle
Export all files used in the last test run as a bundle.
You must run the complete test or suite before exporting, so EyeAutomate knows which files to include.
-
Use File → Export Bundle.
-
Ideal for developing on one machine and running the bundle on another.
Context-Sensitive Help
-
Select a command and press F1 for context-sensitive help.
-
This opens a webpage with command details.
Settings Overview
Settings are located in the Settings menu and also under All Commands in the Command List.
Key Settings:
|
File Synchronization |
Enables files synchronization. |
|
Auto Indent |
Automatically inserts tabs where appropriate. |
|
Set Image Folder |
Sets the default image folder ( |
|
Set Root Folder |
Changes the root directory for scripts, images, and data. Default is the EyeAutomate installation folder. Useful for organizing projects in custom directories. |
|
Set Parameter |
Adds a parameter to the |